Showing posts with label Android tips. Show all posts

Friday, September 28, 2018

How to recover lost or deleted files on your Android phone

How to recover lost or deleted files on your Android phone

Should you lost your important files on your Android device? Here’s how you can regain access to them.


If actually you landed on this page from a search engine result, probably one of the following keywords brought you here;

  • Recover lost files on Android phone
  • How to recover lost files in Android
  • Recover lost android files
Well, now that you are here, I'm going to show you the simple ways you can recover your deleted files on your Android phone


Initially, recovering lost files could be executed on PC, but now it has made its extension towards Android smartphones. Losing relevant files on your smartphone is somewhat painful to experience and may be thinking that gaining access back to those files are nearly impossible. You actually need some useful apps/tools to work on your Android phone; this should prevent you from losing your documents or files even if they were unintentionally deleted.

These tools I'm gonna be sharing with you are available on Google Play. You should search any of the tools’ name on Google Play or rather follow the link I’ve provided.
Just a few seconds away from knowing these tools and how to use them; keep reading.


Must Read: How to Secure Your PC From Hackers


#1. MY ES FILE EXPLORER
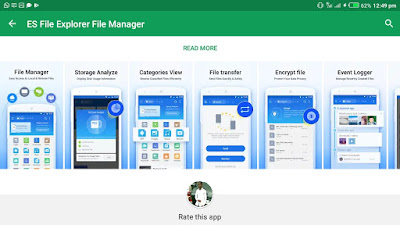


ES File Explorer File Manager available on Google Play Store

This is one of the oldest and trusted file manager or explorer available to every Android devices.
Apart from setting ES File Explorer as your default storage manager (if you wish to) or music player, there's so much task you can handle with it and one of them is what you are about to learn.


If you've ever deleted and recovered a file on Windows PC then you should be familiar with the desktop app known as “Recycle Bin”.
It may interest you to know that ES File Explorer has it also.

Without wasting much time, let's discuss how you can regain access to your lost or deleted Android files with ES File Explorer

Step 1. On your Android device, Download ES File Explorer, preferably from Google Play to avoid malicious attack.

Step 2. After installing the app, launch (open) it and push a slide from your left screen corner and click on “Tools” from the displayed menu

Step 3. Navigate down the menu and there you will find “Recycle Bin” already activated, just click on it and you will find all your deleted files.
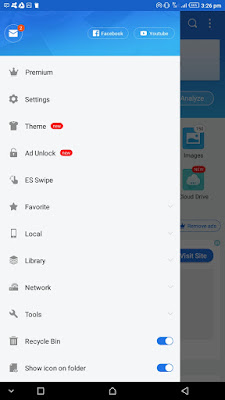

A screenshot of ES File Explorer sliding menu with Recycle bin feature


#2. Dumpster


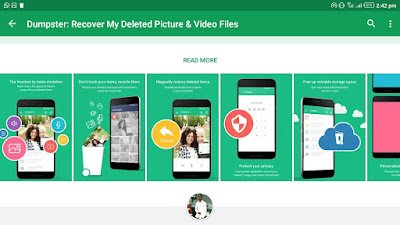
Retrieve your lost or deleted Android files using Dumpster; download from Google Play

This is another amazing tool available on Google Play whose main function is to retrieve deleted files of any format (Mp3, Mp4, txt, jpg, png, doc, and many others), as well as applications.

How To Use Dumpster to Recover Deleted Android Files

Step 2. Open the app and swipe from the left side of your screen to draw out the menu.
Step 3. Go to Settings»»Recycle Bin Settings and select the kind of files you want dumpster to save for you; preferably choose “All” kind of files.
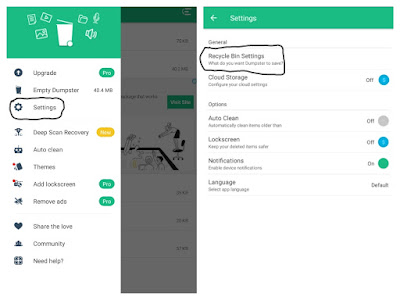


How to setup dumpster recycle bin to help you retrieve deleted contents on Android

Should you ever delete any file from your Android device while Dumpster is installed, you can decide to either permanently delete or retrieve the file. Your decision can only be made in Dumpster app.
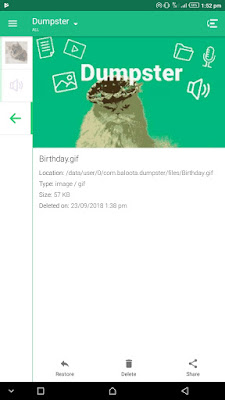

An illustration on how you can restore or permanently delete a file in dumpster recycle bin

Must read: How to effectively recognize Phishing attacks and stay protected

#3. Use Droid Backup
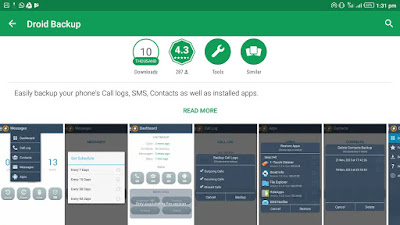


Download and install droid backup from Google play and your relevant files will always be available even when they get lost    


From the name you can easily tell that it’s a backup app which allow you to backup any type of file you do not want to lose. These files include applications, doc files, contacts, SMS, and even call logs.


How To Backup Files Using Droid Backup For Android

Backing up and retrieving files with Droid Backup is very easy. You manually choose what to be backed up and incase you accidentally lose it, Droid backup will always reverse the file into your file storage when you demand for it.

Step 2. Launch the app and click any of the logo belonging to a respective type of file. Assuming you wish to backup an app, for example, you will have to click on the android logo seen at the right end (see screenshot below)


Step 3. Click “backup” and then select the file you want to backup

If your backed up file happen to wipe off from your phone, you can restore it by repeating step 1 and then click “Restore”, then you'll see your backup files, choose the one(s) you want to restore and you're done.


Please share this tips with your friends using the share buttons provides below.


Thursday, August 30, 2018

How To Secure Your Android From Hackers (Cyber Attackers)

How To Secure Your Android From Hackers (Cyber Attackers)


Top Security Tips To Secure Your Android From Cyber Attack (Hackers)

As an Android user, there are many cool kinds of stuff you could do with your Android device, meanwhile, several precautions have to be observed whenever you do what you do, this could help prevent prying eyes from seeing the contents in your Android device.
This post will teach you the essential security measures you should always practice as an Android user. Keep reading...


  • Regularly Update Your Android

Whenever your Android device receives an update, be sure to update your device. This may help fix some bugs/issues if there is any kind on your phone. Also, updating your Android may bring some new features such as improved security to keep your Android device and information protected.

  • Set Up An Antivirus Running

Antivirus/Antimalware apps/software is always ready to secure your device, you just have to download and install a strong Antivirus/Privacy Security app from a trusted source; I recommend Google Play Store.
Apps like Avast Mobile Security, Kaspersky Internet Security are very helpful when it comes to privacy protection.

If your Android device is rooted, the possibility of viruses/malware attacking your phone is on the high side. This is because rooting your Android device can automatically create flaws for attackers to pierce in. To prevent your rooted devices from hackers, a strong Antivirus needs to be installed.

  • Install Apps From Trusted Sources

Downloading and installing Apps from trusted sources like Google Play store gives a huge relief of having your device compromised by attackers. By default, Android is configured to block installation of apps from Unknown Sources. If you wish to download and install apps from sources other than Play Store, be sure you are making use of a malware-free website.


Recommended: How To Prevent Trojans From Entering Your Android Device

  • Always Use A Secure Browser To Surf The Web

There are so many Android browsers available on the web which is developed and is maintained to give users the maximum level of security and protection from malicious websites.

A perfect choice of such protective browser is Google Chrome browser

  • Read Up Permissions Before Installing An App

Many times, we download and install apps on our Android device without first getting to know what access or permissions will the device grant to that app required for executing its function.
Before Installing an app/game, make sure you read its permission(s) to conclude whether they are essential requirements for running the app or are contrary to what the app allegedly declares.

***How worthless and dangerous it would be to have an installed calculator seeking permission to access contact or even GPS***

Conclusion

There are many other tips to secure your Android phone from cyber attacks, however, the above-discussed tips are the most essential precautions you should always observe as an Android user.

Friday, August 17, 2018

How To Avoid Downloading Trojan Viruses On Your Android Device

How To Avoid Downloading Trojan Viruses On Your Android Device

What Are the Trojans?
Since the title says “how to avoid downloading of trojans on Android devices”, you should know that the so-called trojans are enemies to devices and its users.


Trojans are corrupt/unwanted/malicious files which no one would ever want to have on his/her device but still, they find their way into the device via a downloaded software or app that is affected. They are more like Viruses and when they are downloaded along with an affected file, it gives the hacker (developer of the trojan)  full access to that device which he can steal as much information found in it without encountering any security challenge.


It is best you know how these bad files can download itself into a device and some preventive measures you should practice. This post contains several ways you can avoid downloading Trojans on your Android device and stay protected.

Never Fail To Update Your Android


On any device, updates will always flow in whereby the user will decide whether to proceed with the update or ignore. Most times an update may be released to help fix existing bugs/issues affected on the smartphone and if a smartphone is suffering from a specific bug and the user failed to update the system, the bug will remain unfixed.


These new Android updates may not only fix existing bugs, they may come with enhanced security features to keep Android devices protected.
Android Security Patch Level is an example of security updates which Android releases almost on monthly basis to keep users save. Read more on Android blog

Do Not Install Apps From Unknown Sources
There are so many malicious sites on the web waiting for you to pay a visit and download from there, but Android is always ready to keep users safe from harm of which it configures Android devices by default to reject installation of apps from third-party websites other than the Google Play Store.


Most of us have long ago modified this setting to allow installation of apps from sources other than the Play Store. However, there are some cool websites where we can download awesome apps & software but we should learn to take preventive measures.

Google advises Android users should always get Apps and Games from the Play Store. But what about apps such as Fortnite For Android which cannot be found on Google Play? Then you should ensure that the site you want to get that app from is well trusted to be free from malicious contents like Trojans or malware or viruses. I recommend some APK sites like ApkPure, ApkMirror to get those apps.


Not All Free Apps & Games Are Genuine
Now, this may sound more scary and weird, should you download paid apps and games only all in the name of keeping your device(s) and personal information safe?
Not really. Some free apps and games especially modded apps (modified apps) may likely accommodate Trojans. Someone might have modified a paid app and inject trojans in it which he will disclose online for people to download for free. Be careful! Instead, download apps and games from trusted developers.

Read Up Permission Before Installing An App
While trying to install an app we most times skip to read what permissions that app is requiring from the device and we continue with the installation progress probably because we are eager to make use of the app. Don't be too quick to install and use an app, take just little of your time to read what kind of information or permission your device will grant to it if it is installed.
If at the end you conclude that the kind of permission it seeks is what normally should be required for such an app to run on your device, then proceed with the installation.

But what if you download a Recorder app and instead of requesting permissions to access just your Microphone & Storage, it further requests let's say internet access & Location; What for?

Get An Anti-Virus / Anti-Malware App
This is one essential type of apps every Android devices should have. It is best you keep your personal information undisclosed to spies and you may need an assistant to help you with the task, such assistant is an anti-virus or anti-malware app. I will always recommend Avast Mobile Security; it is the perfect app for this job.
An alternative Mobile Security app is Kaspersky Internet Security

You now know what Trojans means and what they do. Be sure to implement the above instructions on the daily use of your Android device, do not forget that your Android device and your personal information needs protection.

Thanks for reading my article.
Be sure to visit this blog every day because we post new Tech update (not excluding Android tips) on daily basis. Thanks again. 


Tuesday, August 14, 2018

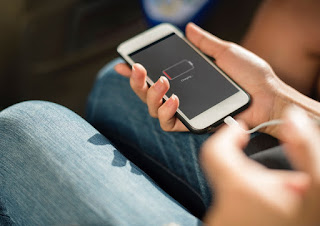
Tips to manage and extend your phone battery health

Tips to manage and extend your phone battery health


As the world is growing old so is our technology making more advancements. Comparing the phones that were used in the 90s with our present-day "smartphone" as we refer to them should give an awkward result.
With these present-day smartphone technologies, life has been made much easier than the way it was 30 years back.

But one would still prefer the odd mobile phones that existed during his youthful age (of course I'm speaking of the elders of today), however, some of them still exist. This is because the battery life cycle of these odd devices are far more durable than the battery we make use of in this present day, and this is as a result of the few numbers of petty workload they were designed for.


It's sad to know that the batteries of our present day smartphone devices do not meet up to the standard advancement that smartphone has acquired. Meanwhile, in order to make our battery have a long-term partnership with our phone, some tweaks have to be practised and that's what this post is all about. Keep reading to learn more…


Do not kill apps when you leave them


Most of us act against this after using an app in our smartphone. I used to be fond of eliminating every app (third-party and built-in) launched on my Android device thinking that it would help prevent rapid battery drain. This habit never produces anything good at the end of the day other than depleting the battery’s lifespan.

But you may want to get rid of annoying apps that consume battery heavily, consider uninstalling such app if it (the app) is incompetent. To know which app sucks more of the juice, then you should try navigating to your Settings>>Battery (in some phones, Power is seen instead) and there you will see how your apps are consuming your phone battery.


Turn off any connectivity after use


Unlike apps which we've found unfriendly when we kill them, connectivities like Wifi, hotspot, Bluetooth, Location (GPS) should be turned off after use to help save battery usage for other relevant tasks. If possible, Mobile (cellular) network should be turned off too.

Alternatively, you can turn on Airplane mode and every other connectivity will be turned off.


Disable Auto Synchronization


By default, apps and services like Google account and its integrated products, Whatsapp, Facebook and others are set to synchronize automatically.
Do you know that Auto Synchronization uses background processes that rely on your mobile data and battery? Yes, that's how it works, and you should consider disabling it and practise manual synchronization. How?
Go to your Settings>>Accounts>> Click the three vertical dots in the upper right corner and untick “Auto-Sync data”.
Moreover, some modifications could be made and this involves; manually adjusting which apps should be in sync and how frequently.


Why not avoid live wallpapers?
Live wallpapers could be so beautiful and give your screen a catchy look but unfortunately, your battery is what is being paid heavily for using live wallpapers.
Implementing static wallpaper is recommended to save your battery from being drained drastically. A lot of Static wallpaper is available online or you might even want to set one of your pictures.


Restrict Background Data For some Apps
Most times while you don't even think of using some apps, unknowingly to you, these apps will forcibly run and send data in the background causing abnormal battery usage. Apps such as the Google Play Store and Gmail are good examples of this habit.
You can restrict background usage of data for every app. Just go to your Settings>>Data Usage>>Mobile data usage>> choose any app you wish to restrict from Background data and turn off the icon.

But Note: Turning off Background data usage for certain apps may cause those apps to malfunction.


Reduce Animation Scale and Background Process
If you really wanna do this, then be ready to become a developer 🤘
To set these changes, you’ll need to access the Developer Options in your Settings, but you won't find it unless you've unlocked “Developer Options.”
To unlock Developer Options, head over to your Settings>>About>> Tap on the Build number 7 times and congratulations you're now a developer.

Now head back to Settings and Click on “Developer Option” above About. Scroll down gently until you see Window animation scale, Transition animation scale, and Animator duration scale. By default, each of these is set to Animation Scale x1, edit and turn off Animation for each case. Doing this will slightly increase your battery life as well as your phone performance.

Still, on that same long list of Developer Options, scroll down to find Background Process limit, and by default, it is set to the Standard limit but adjusting it further by three or four processes can slightly improve your battery life and performance.

NOTE: While on the Developer Options, be careful as any unknown option(s) you alter may change how your phone should function.

RECOMMENDED: These charging habits might reduce your battery lifespan; Here are tips for you

Finally
Maximizing your battery usage will help reserve some amount of juice for other operations. Android is blessed with so many optimizations to help you modify your device to your taste.
I'd love to share more, but let's end it here.
There are many things you can do with your Android device, I beseech you to subscribe to our newsletter below or keep visiting oshetech.com for more Android tips and tech-related gist.
Thanks for reading 👍


Saturday, August 11, 2018

Best ways to schedule a WhatsApp message for future delivery

Best ways to schedule a WhatsApp message for future delivery

Whatsapp

It is very possible to schedule messages on WhatsApp for later delivery. There are many ways to do this with your phone rooted or not. In this post, I've discussed the best methods of Scheduling a WhatsApp message without requiring to root your phone (all I'm saying is, these methods does not require a rooted device).


Method 1
Scheduler for WhatsApp
This is a third-party app developed to perform exactly as its name.

Step 1. Download and install Scheduler for WhatsApp from Apkpure
Reason: Scheduler for WhatsApp isn't available on Google Play

Step 2. Launch (open) the app and enable Accessibility settings to schedule message (just tap OK when you open the app and turn on WhatsApp scheduler)


Step 4. You are almost there, tap on the “+” icon on red to create a schedule

Step 4. Configure how you want the message to be sent; Select Recipient from your WhatsApp contact, set your time schedule and frequency (how many times you want your scheduled message to be sent)

Step 5. Enter your message into the provided box, you may also attach a photo(s) to your message and hit “create” at the top right of your screen.


That's all. Once the scheduled time is reached, your message will be sent to your selected recipient.

Method 2.
SQEDit- Auto Scheduling App


This is another useful third-party app developed for the purpose of scheduling messages for the later time. This app supports not only WhatsApp but other social / messaging platforms too.
With this app, you can schedule Facebook posts, send automatic emails, schedule text messages / SMS as well as setting call reminders.

How To Use SQEDit
Step 1. Download and install SQEDit on your Android device. It's available on Google Play.

Step 2. Launch the app and create an account or you can sign in with your Facebook account

Step 3. From the listed services, select WhatsApp and click “DONE”. Again, Select WhatsApp to create your message schedule.


Step 4. To be able to schedule your message SQEDit need to access your WhatsApp contact, however, you'll be required to enable accessibility in your settings.
Click “ENABLE ACCESSIBILITY” and turn on accessibility for SQEDit


Step 5. Now you are prepared to schedule your message:
  • Type your message in the provided box and include an attachment (photos, doc, music) using the attachment button (depending on what you are composing)

  • Schedule your future date and time

  • Select the number of repeats if you want your scheduled message to be sent more than once in a specified time interval
Step 6. Having provided your info, proceed by clicking the send icon as seen in the screenshot below


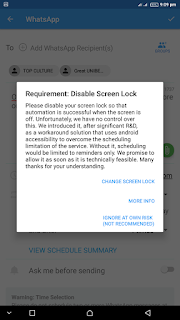
Step 7. Now you will have to disable your screen lock to allow transparency. See reasons as discussed by the developer in the screenshot below


That's all, your messages will be sent as scheduled.


The recommended option for scheduling messages across Facebook, Twitter, Email, SMS and setting reminder
Do It Later


This is my favourite app I use in scheduling messages across my social platforms.
This app will strive to deliver your message as scheduled even if you’re offline and it currently supports Facebook, Twitter and Email only.
To get this started;
Step 1. Download and install “Do it Later”. Get it on Google Play

Step 2. Launch the app and tap the add (+) icon to introduce the social services it supports and choose your target, let's say Facebook.


Step 3. You’ll be directed to where you'll have to sign in your Facebook account. Having signed in, return to the composing page of the app

Step 4. Type your message in the provided box, you may want to include an image(s)


Step 5. Select the number of repeats (by default, repeat is set as “never”)

Step 6. Tap “schedule” at the top right side of your screen to proceed.


Step 7. Your scheduled message goes to the pending list. Click on the pending message and tap send (the telegram icon displaying above your screen). See screenshot below


That's all for using “Do it later” app to schedule messages.

Finally
With the above methods, you should be able to schedule your messages for the future while you may get busy working out other issues of life.
The above three Android apps I discussed have been tested and confirmed working as required. This post was composed according to how I reviewed and make use of the mentioned apps.

Thanks for visiting oshetech.com👊👍