It is very possible to schedule messages on WhatsApp for later delivery. There are many ways to do this with your phone rooted or not. In this post, I've discussed the best methods of Scheduling a WhatsApp message without requiring to root your phone (all I'm saying is, these methods does not require a rooted device).
Method 1
Scheduler for WhatsApp
This is a third-party app developed to perform exactly as its name.
Step 1. Download and install Scheduler for WhatsApp from Apkpure
Reason: Scheduler for WhatsApp isn't available on Google Play
Step 2. Launch (open) the app and enable Accessibility settings to schedule message (just tap OK when you open the app and turn on WhatsApp scheduler)
Step 4. You are almost there, tap on the “+” icon on red to create a schedule
Step 4. Configure how you want the message to be sent; Select Recipient from your WhatsApp contact, set your time schedule and frequency (how many times you want your scheduled message to be sent)
Step 5. Enter your message into the provided box, you may also attach a photo(s) to your message and hit “create” at the top right of your screen.
That's all. Once the scheduled time is reached, your message will be sent to your selected recipient.
Method 2.
SQEDit- Auto Scheduling App
This is another useful third-party app developed for the purpose of scheduling messages for the later time. This app supports not only WhatsApp but other social / messaging platforms too.
With this app, you can schedule Facebook posts, send automatic emails, schedule text messages / SMS as well as setting call reminders.
How To Use SQEDit
Step 2. Launch the app and create an account or you can sign in with your Facebook account
Step 3. From the listed services, select WhatsApp and click “DONE”. Again, Select WhatsApp to create your message schedule.
Step 4. To be able to schedule your message SQEDit need to access your WhatsApp contact, however, you'll be required to enable accessibility in your settings.
Click “ENABLE ACCESSIBILITY” and turn on accessibility for SQEDit
Step 5. Now you are prepared to schedule your message:
- Type your message in the provided box and include an attachment (photos, doc, music) using the attachment button (depending on what you are composing)
- Schedule your future date and time
- Select the number of repeats if you want your scheduled message to be sent more than once in a specified time interval
Step 6. Having provided your info, proceed by clicking the send icon as seen in the screenshot below
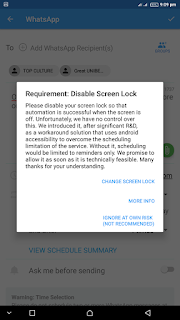
Step 7. Now you will have to disable your screen lock to allow transparency. See reasons as discussed by the developer in the screenshot below
That's all, your messages will be sent as scheduled.
The recommended option for scheduling messages across Facebook, Twitter, Email, SMS and setting reminder
Do It Later
This is my favourite app I use in scheduling messages across my social platforms.
This app will strive to deliver your message as scheduled even if you’re offline and it currently supports Facebook, Twitter and Email only.
To get this started;
Step 2. Launch the app and tap the add (+) icon to introduce the social services it supports and choose your target, let's say Facebook.
Step 3. You’ll be directed to where you'll have to sign in your Facebook account. Having signed in, return to the composing page of the app
Step 4. Type your message in the provided box, you may want to include an image(s)
Step 5. Select the number of repeats (by default, repeat is set as “never”)
Step 6. Tap “schedule” at the top right side of your screen to proceed.
Step 7. Your scheduled message goes to the pending list. Click on the pending message and tap send (the telegram icon displaying above your screen). See screenshot below
That's all for using “Do it later” app to schedule messages.
Finally
With the above methods, you should be able to schedule your messages for the future while you may get busy working out other issues of life.
The above three Android apps I discussed have been tested and confirmed working as required. This post was composed according to how I reviewed and make use of the mentioned apps.
Thanks for visiting oshetech.com👊👍


